使用漏斗链进行分类或传递物品时,常常会发现漏斗速度太慢,难以收集全部掉落物.或者漏斗太多,影响性能.而现有的漏斗加速mod则是引入新的快速漏斗,存在各种兼容问题.开服时发现paper服务器可以修改原版漏斗速度,而因此萌生想法,编写一个可以修改原版漏斗速度的mod.
本项目已开源.可直接下载或克隆代码.
所有项目均已上传至网络,建议前往Modrinth 下载.
本文已不适用于最新版.
本mod支持Minecraft 1.19.4版本,需要Fabric及Fabric-api,以及前置mod: modmenu(≥6.2.1)
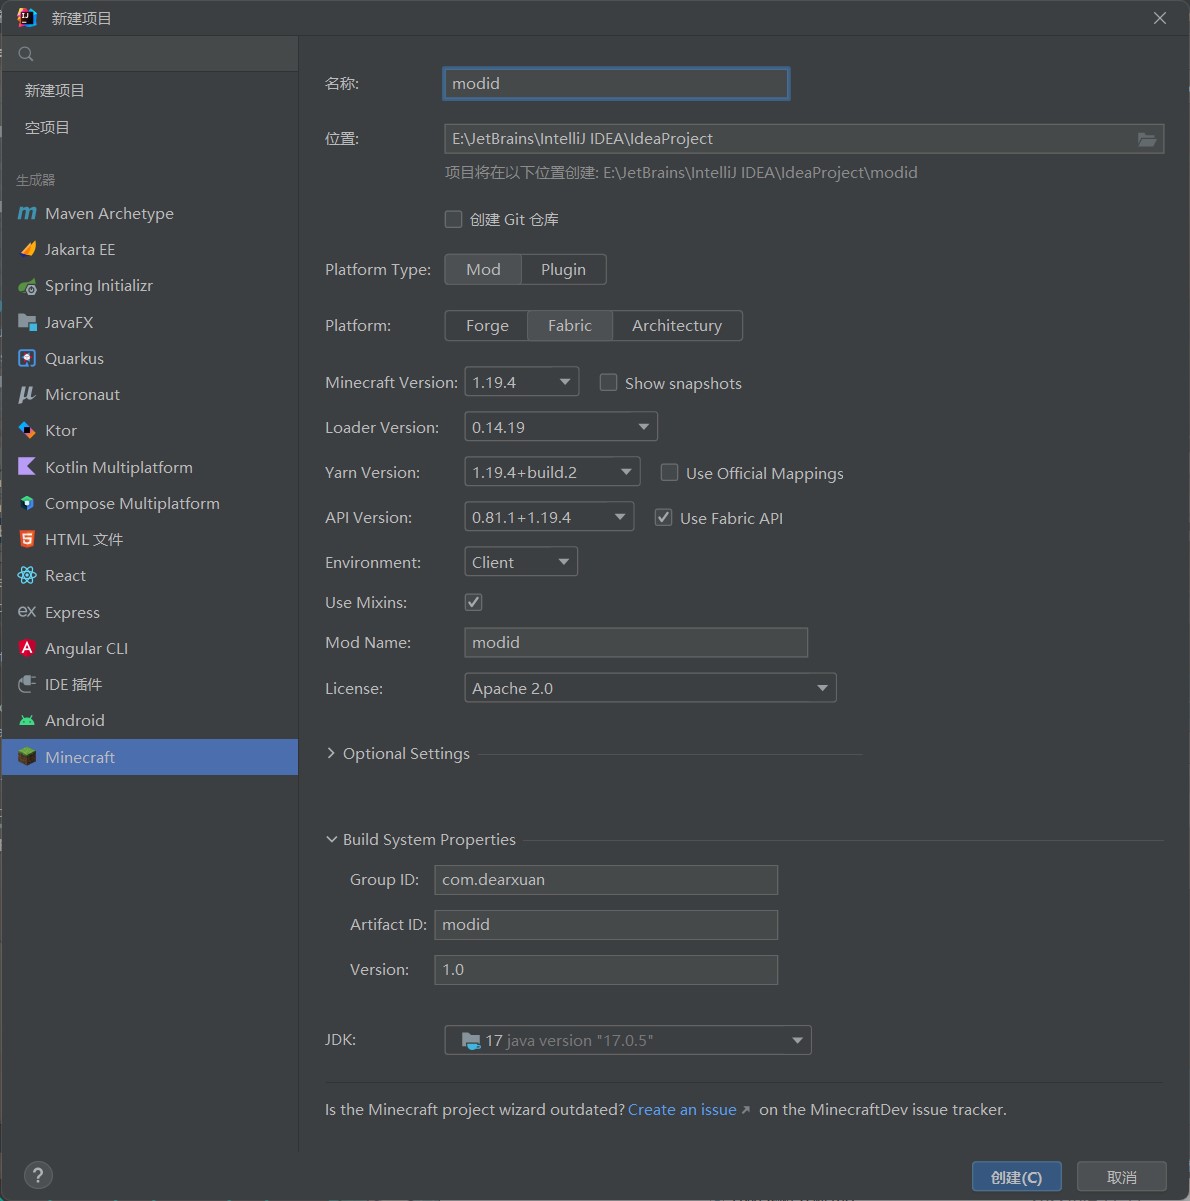
本项目采用 IDEA 开发,在插件市场下载Minecraft Development ,来快速初始化项目.
如果项目有大写字母,则创建完成后,需要前往src/main/resources/fabric.mod.json中修改id一项为小写,因为modid不支持大写字母.
创建项目需要下载大量文件,需耐心等待.创建完成后,先彻底关闭IDEA,再重写打开项目.
本mod的功能是修改原版漏斗代码,因此需要用到fabric提供的Mixin 功能,该功能可将自己的代码注入到游戏源码中,而无需对其进行修改.
此外modmenu模组提供了可视化菜单,可以方便菜单制作,因而列为前置mod.实际上即使没有该前置也可以正常运行,但是无法打开菜单.
在build.gradle中引入以下maven和依赖
1
2
3
4
5
6
7
8
9
10
11
12
13
14
15
16
17
18
19
20
21
22
23
24
25
26
27
28
29
30
31
32
33
34
35
36
37
38
repositories { maven { url "https://maven.shedaniel.me/" } maven { url "https://maven.terraformersmc.com/releases/" } maven { url "https://maven.architectury.dev/" } } dependencies { minecraft "com.mojang:minecraft:${project.minecraft_version}" mappings "net.fabricmc:yarn:${project.yarn_mappings}:v2" modImplementation "net.fabricmc:fabric-loader:${project.loader_version}" modImplementation "net.fabricmc.fabric-api:fabric-api:${project.fabric_version}" modApi("me.shedaniel.cloth:cloth-config-fabric:10.0.96" ) { exclude (group : "net.fabricmc.fabric-api" ) } modApi "com.terraformersmc:modmenu:6.2.1" }
此时右上角会提示重写构建,等待一段时间即可.
展开Gradle一栏,运行genSources,即可进行反编译.所需时间视电脑配置而定.
如果找不到这一栏,则可以在项目根目录下执行以下命令.
如果失败则重启IDEA,多尝试几次.
创建Mixin配置文件src/main/resources/modid.mixin.json,如图所示.注意要修改为你自己的modid
修改fabric.mod.json,天上你的Mixin配置文件名称
1
2
3
"mixins" : [ "modid.mixins.json" ]
以我的项目为例,modid为"EasyHopper",则在com.dearxuan.easyhopper下创建目录mixin,并在该目录下创建EasyHopperMixin.java
由于我们要修改漏斗函数,因此我们直接搜索漏斗的英文,简单查看后,可以发现控制漏斗事件的类为HopperBlockEntity.class,因此我们注入这个类.
在EasyHopperMixin.java中编写代码如下,注意修改为你的包名.
1
2
3
4
5
6
7
8
9
10
11
12
13
14
15
16
17
18
19
20
21
22
23
24
package com.dearxuan.easyhopper.mixin;import net.minecraft.block.BlockState;import net.minecraft.block.HopperBlock;import net.minecraft.block.entity.BlockEntityType;import net.minecraft.block.entity.HopperBlockEntity;import net.minecraft.block.entity.LootableContainerBlockEntity;import net.minecraft.inventory.Inventory;import net.minecraft.util.math.BlockPos;import net.minecraft.world.World;import org.spongepowered.asm.mixin.Mixin;import org.spongepowered.asm.mixin.Shadow;import org.spongepowered.asm.mixin.gen.Invoker;import org.spongepowered.asm.mixin.injection.At;import org.spongepowered.asm.mixin.injection.Inject;import org.spongepowered.asm.mixin.injection.callback.CallbackInfo;import org.spongepowered.asm.mixin.injection.callback.CallbackInfoReturnable;import java.util.function.BooleanSupplier;@Mixin(HopperBlockEntity.class) public abstract class EasyHopperMixin extends LootableContainerBlockEntity { }
其中@Mixin注释用于标识我们要注入的类.此时IDEA会将这段代码标红,因为缺少了构造函数,可以使用IDEA来自动创建.
现在这个类已经被成功注入,但我们还不知道漏斗的控制逻辑,因此无法进行编码.接下来查看HopperBlockEntity.class的源码(按住Ctrl+右键可以快速跳转),因为该游戏的事件都是基于刻(tick)来处理的,因此我们搜索"tick",仅有一个函数与此相符.为了便于分析,此处额外展示了两个用到的函数.
1
2
3
4
5
6
7
8
9
10
11
12
13
14
15
16
public static void serverTick (World world, BlockPos pos, BlockState state, HopperBlockEntity blockEntity) { --blockEntity.transferCooldown; blockEntity.lastTickTime = world.getTime(); if (!blockEntity.needsCooldown()) { blockEntity.setTransferCooldown(0 ); HopperBlockEntity.insertAndExtract(world, pos, state, blockEntity, () -> HopperBlockEntity.extract(world, blockEntity)); } } private boolean needsCooldown () { return this .transferCooldown > 0 ; } private void setTransferCooldown (int transferCooldown) { this .transferCooldown = transferCooldown; }
于是我们可以猜测,该函数控制这漏斗何时输送物品,其中blockEntity.transferCooldown是冷却时间,每个tick会减一,而needsCooldown()函数根据blockEntity.transferCooldown是否为正来判断漏斗是否处于冷却中,为零或负则是冷却完毕.
一旦冷却完毕,则执行blockEntity.setTransferCooldown(0),推测是用于防止出现负数的.而HopperBlockEntity.insertAndExtract()函数显然是用来输入输出物品的.
因此我们只需要修改setTransferCooldown()这个函数,即可实现修改冷却时间的功能.
1
2
3
4
5
6
7
8
9
10
11
12
13
14
15
16
17
18
19
20
21
@Mixin(HopperBlockEntity.class) public abstract class EasyHopperMixin extends LootableContainerBlockEntity { @Shadow private int transferCooldown; protected EasyHopperMixin (BlockEntityType<?> blockEntityType, BlockPos blockPos, BlockState blockState) { super (blockEntityType, blockPos, blockState); } @Inject( method = {"setTransferCooldown"}, at = {@At("HEAD")}, cancellable = true ) private void EasyCooldown_head (int cooldown, CallbackInfo info) { if (cooldown > 0 ){ this .transferCooldown = cooldown - 8 + ModConfig.INSTANCE.TRANSFER_COOLDOWN; info.cancel(); } } }
由于transferCooldown是私有变量,无法直接访问,因此使用@Shadow来映射.这将把原私有变量映射到你自己创建的类中,以便开发者进行修改.
你会发现我在函数参数里加了CallbackInfo info一项,这是用来控制返回值的,我们需要利用它来实现中途退出.
现在开始修改setTransferCooldown()函数,这里我们选择@Inject注释,它可以将你的代码插入到原函数中,methed指原函数名,at指插入位置,为了屏蔽掉原函数,我们应该把代码插入到原函数头部,然后直接返回,以使后面部分失效.cancellable指原函数能否中途退出,显然需要为true.
下面代码中的cooldown - 8是为了减去原有的冷却时间,从而改成我们需要的值,ModConfig.INSTANCE.TRANSFER_COOLDOWN是指我们自己规定的冷却时间,该部分在配置文件中定义,会在接下来介绍.
最后的info.cancel()指取消原函数执行,相当于在我们代码的尾部,原函数头部插入了return,即屏取消了原函数的执行.
上面已分析出HopperBlockEntity.insertAndExtract()是用于执行输入输出操作,因此我们继续查看源码.
1
2
3
4
5
6
7
8
9
10
11
12
13
14
15
16
17
18
19
20
private static boolean insertAndExtract (World world, BlockPos pos, BlockState state, HopperBlockEntity blockEntity, BooleanSupplier booleanSupplier) { if (world.isClient) { return false ; } if (!blockEntity.needsCooldown() && state.get(HopperBlock.ENABLED).booleanValue()) { boolean bl = false ; if (!blockEntity.isEmpty()) { bl = HopperBlockEntity.insert(world, pos, state, blockEntity); } if (!blockEntity.isFull()) { bl |= booleanSupplier.getAsBoolean(); } if (bl) { blockEntity.setTransferCooldown(8 ); HopperBlockEntity.markDirty(world, pos, state); return true ; } } return false ; }
先猜测代码含义,显然第一步是判断自己是客户端还是服务端,该函数仅在服务端执行.然后检查漏斗是否在冷却中或不可用.
boolean bl = false则定义了一个布尔变量,用于判断该漏斗是否使用过,如果为true,则已经使用,那么就需要blockEntity.setTransferCooldown(8)来重新设置冷却时间.而blockEntity.isEmpty()和blockEntity.isFull()显然是用来检查容器中是否有物品的,即输入输出功能.因此我们只需要在这里加个循环即可实现任意数量物品的输入输出.
我们的思路仍然是在原函数头部插入自己的代码,注意到其中用到了四个private函数,因此我们需要先提取出这四个函数
1
2
3
4
5
6
7
8
9
10
11
12
13
14
15
16
17
@Mixin(HopperBlockEntity.class) interface IEasyHopperEntity { @Invoker("needsCooldown") public boolean Invoke_needsCooldown () ; @Invoker("isFull") public boolean Invoke_isFull () ; @Invoker("setTransferCooldown") public void Invoke_setTransferCooldown (int transferCooldown) ; @Invoker("insert") public static boolean Invoke_insert (World world, BlockPos pos, BlockState state, Inventory inventory) { return false ; }; }
@Invoker允许你访问一个私有的方法,类似@Shadow,它可以将原本不可见的方法映射为你新定义的方法.其中静态函数必须要有函数体,不过它永远也不会执行.
编写的函数如下
1
2
3
4
5
6
7
8
9
10
11
12
13
14
15
16
17
18
19
20
21
22
23
24
25
26
27
28
29
30
31
32
33
34
35
@Inject( method = {"insertAndExtract"}, at = {@At("HEAD")}, cancellable = true ) private static void Insert ( World world, BlockPos pos, BlockState state, HopperBlockEntity blockEntity, BooleanSupplier booleanSupplier, CallbackInfoReturnable<Boolean> info) { if (world.isClient) { info.setReturnValue(false ); } if (!((IEasyHopperEntity) blockEntity).Invoke_needsCooldown() && state.get(HopperBlock.ENABLED).booleanValue()) { boolean bl = false ; for (int i=0 ;i<ModConfig.INSTANCE.TRANSFER_OUTPUT_COUNT;i++){ if (!blockEntity.isEmpty()) { bl = IEasyHopperEntity.Invoke_insert(world, pos, state, blockEntity); } } for (int i=0 ;i<ModConfig.INSTANCE.TRANSFER_INPUT_COUNT;i++){ if (!((IEasyHopperEntity) blockEntity).Invoke_isFull()) { bl |= booleanSupplier.getAsBoolean(); } } if (bl) { ((IEasyHopperEntity) blockEntity).Invoke_setTransferCooldown(8 ); HopperBlockEntity.markDirty(world, pos, state); info.setReturnValue(true ); } } info.setReturnValue(false ); }
由于原函数有返回值,因此末尾需要改用CallbackInfoReturnable<Boolean> info,将原本的return true改为info.setReturnValue(true),即可实现中途退出的功能.其他代码直接复制下来即可,部分私有函数需要转换成自己刚刚定义的接口来调用.
最后,我们在easyhopper.mixin.json中注册上面的两个Mixin
1
2
3
4
5
6
7
8
9
10
11
12
13
14
15
16
{ "required" : true , "minVersion" : "0.8" , "package" : "com.dearxuan.easyhopper.mixin" , "compatibilityLevel" : "JAVA_17" , "mixins" : [ "EasyHopperMixin" , "IEasyHopperEntity" ] , "client" : [ ] , "injectors" : { "defaultRequire" : 1 } }
完整的EasyHopperMixin.java代码如下
1
2
3
4
5
6
7
8
9
10
11
12
13
14
15
16
17
18
19
20
21
22
23
24
25
26
27
28
29
30
31
32
33
34
35
36
37
38
39
40
41
42
43
44
45
46
47
48
49
50
51
52
53
54
55
56
57
58
59
60
61
62
63
64
65
66
67
68
69
70
71
72
73
74
75
76
77
78
79
80
81
82
83
84
85
86
87
88
89
90
91
92
93
94
95
96
package com.dearxuan.easyhopper.mixin;import com.dearxuan.easyhopper.Config.ModConfig;import net.minecraft.block.BlockState;import net.minecraft.block.HopperBlock;import net.minecraft.block.entity.BlockEntityType;import net.minecraft.block.entity.HopperBlockEntity;import net.minecraft.block.entity.LootableContainerBlockEntity;import net.minecraft.inventory.Inventory;import net.minecraft.util.math.BlockPos;import net.minecraft.world.World;import org.spongepowered.asm.mixin.Mixin;import org.spongepowered.asm.mixin.Shadow;import org.spongepowered.asm.mixin.gen.Invoker;import org.spongepowered.asm.mixin.injection.At;import org.spongepowered.asm.mixin.injection.Inject;import org.spongepowered.asm.mixin.injection.callback.CallbackInfo;import org.spongepowered.asm.mixin.injection.callback.CallbackInfoReturnable;import java.util.function.BooleanSupplier;@Mixin(HopperBlockEntity.class) public abstract class EasyHopperMixin extends LootableContainerBlockEntity { @Shadow private int transferCooldown; protected EasyHopperMixin (BlockEntityType<?> blockEntityType, BlockPos blockPos, BlockState blockState) { super (blockEntityType, blockPos, blockState); } @Inject( method = {"setTransferCooldown"}, at = {@At("HEAD")}, cancellable = true ) private void EasyCooldown_head (int cooldown, CallbackInfo info) { if (cooldown > 0 ){ this .transferCooldown = cooldown - 8 + ModConfig.INSTANCE.TRANSFER_COOLDOWN; info.cancel(); } } @Inject( method = {"insertAndExtract"}, at = {@At("HEAD")}, cancellable = true ) private static void Insert ( World world, BlockPos pos, BlockState state, HopperBlockEntity blockEntity, BooleanSupplier booleanSupplier, CallbackInfoReturnable<Boolean> info) { if (world.isClient) { info.setReturnValue(false ); } if (!((IEasyHopperEntity) blockEntity).Invoke_needsCooldown() && state.get(HopperBlock.ENABLED).booleanValue()) { boolean bl = false ; for (int i=0 ;i<ModConfig.INSTANCE.TRANSFER_OUTPUT_COUNT;i++){ if (!blockEntity.isEmpty()) { bl = IEasyHopperEntity.Invoke_insert(world, pos, state, blockEntity); } } for (int i=0 ;i<ModConfig.INSTANCE.TRANSFER_INPUT_COUNT;i++){ if (!((IEasyHopperEntity) blockEntity).Invoke_isFull()) { bl |= booleanSupplier.getAsBoolean(); } } if (bl) { ((IEasyHopperEntity) blockEntity).Invoke_setTransferCooldown(8 ); HopperBlockEntity.markDirty(world, pos, state); info.setReturnValue(true ); } } info.setReturnValue(false ); } } @Mixin(HopperBlockEntity.class) interface IEasyHopperEntity { @Invoker("needsCooldown") public boolean Invoke_needsCooldown () ; @Invoker("isFull") public boolean Invoke_isFull () ; @Invoker("setTransferCooldown") public void Invoke_setTransferCooldown (int transferCooldown) ; @Invoker("insert") public static boolean Invoke_insert (World world, BlockPos pos, BlockState state, Inventory inventory) { return false ; }; }
创建Config目录和其中的两个java文件,如下图所示
为ModConfig编写如下代码
1
2
3
4
5
6
7
8
9
10
11
12
13
14
15
16
17
18
19
20
21
22
23
24
25
26
27
28
29
30
31
32
33
34
35
36
package com.dearxuan.easyhopper.Config;import me.shedaniel.autoconfig.AutoConfig;import me.shedaniel.autoconfig.ConfigData;import me.shedaniel.autoconfig.annotation.Config;import me.shedaniel.autoconfig.annotation.ConfigEntry.Gui.Excluded;import me.shedaniel.autoconfig.serializer.GsonConfigSerializer;import me.shedaniel.cloth.clothconfig.shadowed.blue.endless.jankson.Comment;@Config( name = "easyhopper" ) public class ModConfig implements ConfigData { @Excluded public static ModConfig INSTANCE; @Comment("控制漏斗输送物品冷却时间") public int TRANSFER_COOLDOWN = 8 ; @Comment("控制漏斗每次输入多少个物品") public int TRANSFER_INPUT_COUNT = 1 ; @Comment("控制漏斗每次输出多少个物品") public int TRANSFER_OUTPUT_COUNT = 1 ; public ModConfig () { } public static void init () { AutoConfig.register(ModConfig.class, GsonConfigSerializer::new ); INSTANCE = (ModConfig) AutoConfig .getConfigHolder(ModConfig.class) .getConfig(); } }
@Config表面这个类是一个配置类,它将会被序列化后保存在游戏目录的config文件夹下.
@Excluded注释表面该字段不会被保存,@Comment则是注释,在设置界面,当鼠标悬浮于某一项上方时显示.init()函数用于注册和初始化这个类.在EasyHopper.java中执行这个函数
1
2
3
4
5
6
7
public class EasyHopper implements ModInitializer { @Override public void onInitialize () { ModConfig.init(); } }
在ModMenu.java中编写如下代码
1
2
3
4
5
6
7
8
9
10
11
12
13
14
15
16
17
18
19
package com.dearxuan.easyhopper.Config;import com.terraformersmc.modmenu.api.ConfigScreenFactory;import com.terraformersmc.modmenu.api.ModMenuApi;import me.shedaniel.autoconfig.AutoConfig;import net.fabricmc.api.EnvType;import net.fabricmc.api.Environment;@Environment(EnvType.CLIENT) public class ModMenu implements ModMenuApi { @Override public ConfigScreenFactory<?> getModConfigScreenFactory(){ return parent -> AutoConfig .getConfigScreen(ModConfig.class, parent) .get(); } }
此代码将会为该配置类自动生成一个图形界面,便于用户可视化修改.只有安装了前置模组modmenu才会看到设置按钮,同时许多模组也使用了该前置mod.即使不安装,也可以正常运行,但是修改配置较为麻烦,因此列入到前置模组名单,来强制用户安装.同时还要添加modmenu的入口点.修改fabric.mod.json如下
1
2
3
4
5
6
7
8
9
10
11
12
13
14
15
16
17
18
19
20
21
22
23
24
{ "entrypoints" : { "client" : [ "com.dearxuan.easyhopper.client.EasyHopperClient" ] , "main" : [ "com.dearxuan.easyhopper.EasyHopper" ] , "modmenu" : [ "com.dearxuan.easyhopper.Config.ModMenu" ] } , "mixins" : [ "easyhopper.mixins.json" ] , "depends" : { "fabricloader" : ">=${loader_version}" , "fabric" : "*" , "fabric-api" : "*" , "minecraft" : "${minecraft_version}" , "modmenu" : ">=6.2.1" } }
至此mod开发完毕.如果你想要源码,请克隆以下仓库 .
1 https://gitee.com/dearxuan/EasyHopper.git
创建文件src/main/resources/assets/easyhopper/lang/zh_cn.json,写入以下翻译
1
2
3
4
5
6
{ "text.autoconfig.easyhopper.title" : "轻松漏斗(Easy Hopper)" , "text.autoconfig.easyhopper.option.TRANSFER_COOLDOWN" : "冷却时间(刻)" , "text.autoconfig.easyhopper.option.TRANSFER_INPUT_COUNT" : "每次输入物品数量(个)" , "text.autoconfig.easyhopper.option.TRANSFER_OUTPUT_COUNT" : "每次输出物品数量(个)" }
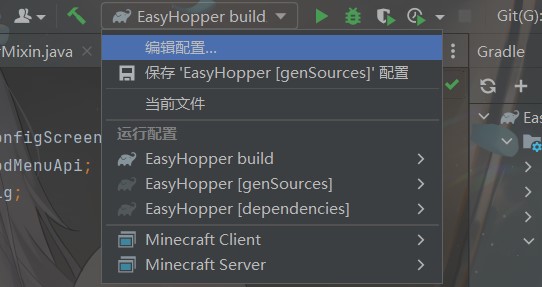
在右上角修改运行配置,其中build是生成jar文件,输出目录是项目路径/build/libs/modid-{版本}.jar
而Minecraft Client则会直接打开游戏
IDEA里可以运行,单独的jar放到mod文件夹却失效 可能是你缺少了前置mod,在IDEA里测试时,会自动将你依赖的mod一同加载,如下图.请仔细检查是否有一些mod未被添加到依赖列表里.
一直卡在构建