BitmapData类
BitmapData类专门用于位图处理,与Bitmap的不同点在于,它使用指针直接修改内存,而Bitmap是使用SetPixel()方法间接修改颜色,因此其效率远远超过SetPixel()
传统代码
以灰度处理为例,为了便于演示,此处的灰度算法采用
Gray=(R+G+B) / 3
传统方式1
2
3
4
5
6
7
8
9
10
11
12
| private void Gray_Tradition()
{
for(int i = 0; i < bitmap.Width; i++)
{
for(int j = 0; j < bitmap.Height; j++)
{
Color color = bitmap.GetPixel(i, j);
int RGB = (color.R + color.G + color.B) / 3;
bitmap.SetPixel(i, j, Color.FromArgb(255, RGB, RGB, RGB));
}
}
}
|
使用BitmapData的代码
BitmapData方式1
2
3
4
5
6
7
8
9
10
11
12
13
14
15
16
17
18
19
20
21
22
23
24
25
26
27
28
29
30
31
32
33
| private void Gray_BitmapData()
{
int width = bitmap.Width, height = bitmap.Height;
BitmapData bitmapData = bitmap.LockBits(
new Rectangle(0, 0, width, height),
ImageLockMode.ReadWrite,
PixelFormat.Format24bppRgb);
int size = width * height * 3;
byte[] srcArray = new byte[size];
IntPtr ptr = bitmapData.Scan0;
Marshal.Copy(ptr, srcArray, 0, size);
int p;
for (int i = 0; i < width; i++)
{
for (int j = 0; j < height; j++)
{
p = j * width * 3 + i * 3;
byte color = (byte)((srcArray[p] + srcArray[p + 1] + srcArray[p + 2]) / 3);
srcArray[p] = srcArray[p + 1] = srcArray[p + 2] = color;
}
}
Marshal.Copy(srcArray, 0, ptr, size);
bitmap.UnlockBits(bitmapData);
}
|
效率对比
代码
测试代码1
2
3
4
5
6
7
8
9
10
11
12
13
14
15
| private void onTest()
{
double t1, t2;
Stopwatch watch = new Stopwatch();
watch.Start();
Gray_BitmapData();
watch.Stop();
t1 = watch.Elapsed.TotalMilliseconds;
watch.Reset();
watch.Start();
Gray_Tradition();
watch.Stop();
t2 = watch.Elapsed.TotalMilliseconds;
MessageBox.Show("BitmapData=" + (long)t1 + "\nTradition=" + (long)t2);
}
|
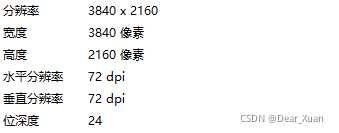
图片信息
耗时
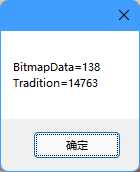
可以看到传统方法的耗时是使用BitmapData方法的106倍,需要整整14秒,而BitmapData仅用了0.1秒
GPU加速
使用CUDA生成dll后,可以在GPU上高效处理图像,但是这种方式需要使用dll,而且异常繁琐,因此只适合对效率有极高要求时使用
生成Dll
dll.cu1
2
3
4
5
6
7
8
9
10
11
12
13
14
15
16
17
18
19
20
21
22
23
24
25
26
27
28
| #include "cuda_runtime.h"
#include "device_launch_parameters.h"
#include <stdio.h>
#include <Windows.h>
__global__ void DoInKernel(byte* o, int num)
{
int i = blockIdx.x * blockDim.x + threadIdx.x;
if (i >= num) return;
byte* ori = o + i * 3;
ori[0] = ori[1] = ori[2] = (ori[0] + ori[1] + ori[2]) / 3;
}
extern "C" _declspec(dllexport) void Gray(byte * oriArray, int num) {
int size = num * 3 * sizeof(byte);
byte* dev_ori;
cudaMalloc((void**)&dev_ori, size);
cudaMemcpy(dev_ori, oriArray, size, cudaMemcpyHostToDevice);
DoInKernel << <num / 1024 + 1, 1024 >> > (dev_ori, num);
cudaMemcpy(oriArray, dev_ori, size, cudaMemcpyDeviceToHost);
cudaFree(dev_ori);
}
|
实际上GPU的thread和block数量应该根据实际数组大小来动态调整,但是这里为了演示方便,直接定义1024个线程
调用Dll
调用Dll1
2
| [DllImport("CUDA.dll", EntryPoint = "Gray", CallingConvention = CallingConvention.Cdecl)]
public static extern void Gray(IntPtr ori, int num);
|
此时不需要定义缓冲区数组了,可以直接把数据复制到显存中使用
Gray_GPU1
2
3
4
5
6
7
8
9
10
11
12
13
14
15
16
17
| private void Gray_GPU()
{
int width = bitmap.Width, height = bitmap.Height;
BitmapData bitmapData = bitmap.LockBits(
new Rectangle(0, 0, width, height),
ImageLockMode.ReadWrite,
PixelFormat.Format24bppRgb);
int size = width * height * 3;
IntPtr ptr = bitmapData.Scan0;
Gray(ptr, width * height);
bitmap.UnlockBits(bitmapData);
pictureBox1.Refresh();
}
|
耗时
由于加载dll需要时间,因此第二次执行的耗时才是真正的GPU执行时间
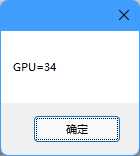
仅仅用了34毫秒